How to Prepare Ground for Shed: Step-by-Step Guide
Copy Link

Table of Contents
- Why Proper Site Preparation Matters for Your Shed
- Assess Your Soil Type and Site Conditions
- How to Prepare Ground for Shed: Clear and Level the Site
- Drainage for Shed Foundation: Preventing Water Damage
- Gravel Shed Base: Building a Stable Foundation
- Leveling Ground for Shed: Achieving the Perfect Slope
- Shed Foundation Options: Concrete Blocks vs. Gravel
- Common Mistakes to Avoid During Ground Preparation
Last Updated: August 1, 2026
Why Proper Site Preparation Matters for Your Shed
A shed sitting on poorly prepared ground will shift, settle unevenly, and eventually fail structurally. Water damage, rot, and sagging floors are all consequences of skipping this critical step. Understanding how to prepare ground for shed is the difference between a structure that stands solid for 20 years and one that becomes a headache within five. This guide walks you through every step of the process, from clearing vegetation to compacting gravel and choosing your foundation type.
Assess Your Soil Type and Site Conditions
Before you move a single shovel of dirt, understand what you’re working with. Soil composition determines how well your shed foundation will perform. Clay-heavy soil holds water and shifts seasonally. Sandy soil drains quickly but offers less stability.
Understanding soil composition and drainage patterns
Grab a handful of soil from your shed site and squeeze it. If it forms a tight ball that doesn’t crumble, you have clay-dominant soil. If it falls apart immediately, you’re dealing with sand. What matters is drainage, water pooling around your shed foundation is the fastest route to rot and structural failure.
Slope matters too. If your yard naturally slopes toward the shed location, water will run toward it constantly. A slope away from the structure, even a gentle 2-3 percent grade, directs moisture away and prevents pooling. If you’re building on clay, consider adding a geotextile fabric layer to prevent the gravel from sinking into the soil over time.
Checking for utility lines and permits
Before you dig, call 811 or contact your local utility locating service. Hitting a gas line, electrical conduit, or water main is dangerous and expensive. Most services mark lines for free within a few business days.
Check your township or county regulations for shed permits. Many areas require permits for structures over a certain size, typically 100-200 square feet, though this varies. Some jurisdictions also have setback requirements, meaning your shed must be a minimum distance from property lines. Riehl Structures can help guide you through local code requirements when you’re planning your structure, ensuring your site prep aligns with what’s actually permitted in your area. A permitted structure is documented, insured, and resalable.
How to Prepare Ground for Shed: Clear and Level the Site
Clearing vegetation and leveling uneven terrain are the foundation of everything that follows.
Removing sod and vegetation
Mark out the area with string or chalk, making it at least 2-3 feet larger than your shed’s actual dimensions. Use a flat shovel to cut and peel back sod in strips. Rent a sod cutter if your area is large, it saves hours of manual labor. Remove any roots, rocks, and debris down to bare soil. Soft spots indicate areas where water sits or organic matter hasn’t fully decomposed, mark them for extra attention during the leveling phase.
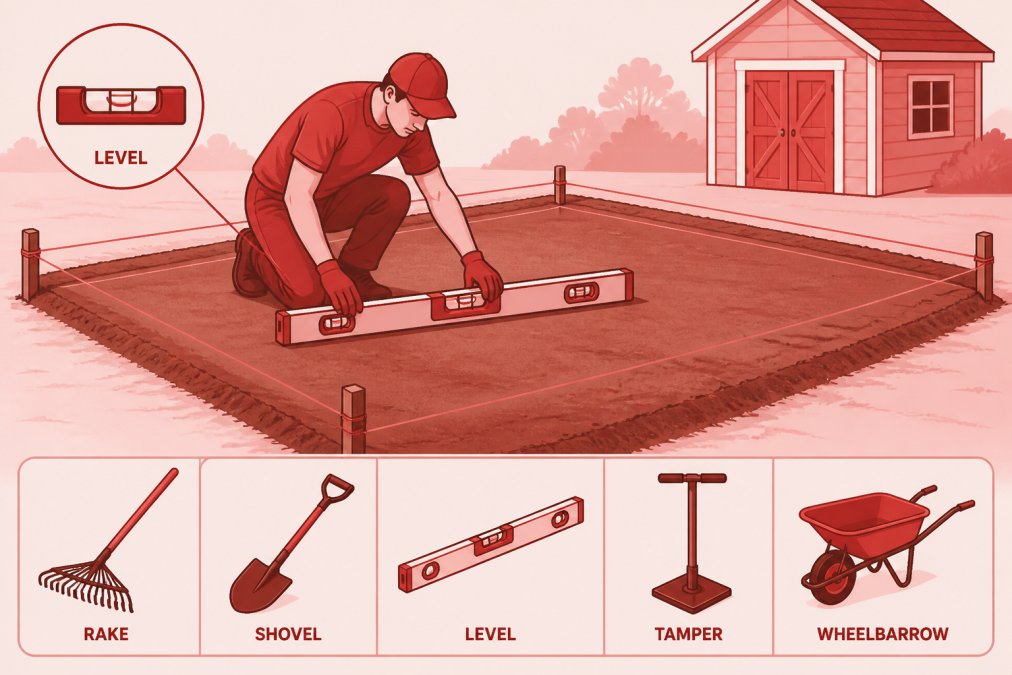
Using a carpenter’s level and grading tools
A 4-foot carpenter’s level is ideal for detecting slopes across your entire shed footprint. Place it on the ground in multiple directions: front to back, side to side, and diagonally corner to corner. Where the level shows low spots, add fill material. Where it shows high spots, remove soil. The goal is a level platform, though a very slight slope away from the structure (1-2 percent) actually improves drainage.
Rent a hand tamper or vibratory compactor for larger areas. After you’ve moved soil to level the ground, compact it firmly in layers, add 3-4 inches of soil, compact it, then add more. This prevents settling later.
Drainage for Shed Foundation: Preventing Water Damage
Water is the enemy of any outdoor structure. Standing water rots wood, rusts metal, and destabilizes foundations.
Managing slope and water runoff
Even a gentle slope directs water away from the structure. If your site naturally slopes toward the shed location, consider slightly raising the shed placement to create slope away from it. This might mean adding 4-6 inches of fill in the area where your shed will sit.
Create a shallow swale or drainage channel around the perimeter if water tends to collect. A 6-inch-wide, 2-3 inch-deep channel graded away from the shed directs runoff effectively. For sites with serious drainage issues, consider installing a French drain or perforated drainage pipe around the shed perimeter.
Installing moisture barriers and geotextile fabric
Landscape fabric (geotextile) prevents gravel from sinking into soil while allowing water to drain through. Lay it down after you’ve leveled and compacted your base, before adding the crushed stone layer. Overlap fabric seams by 12 inches and secure edges with landscape stakes or pins. For sheds on clay soil or in wet areas, consider a heavier-duty geotextile rated for higher water flow. This layer costs under $100 for most shed footprints and extends the life of your foundation by years.
Gravel Shed Base: Building a Stable Foundation
Crushed stone and properly compacted gravel create the sub-base that supports your shed and allows water to drain.
Selecting the right aggregate and crushed stone
Use crushed limestone or angular crushed stone, not rounded river rock. Angular stone locks together and compacts tightly. Use 3/4-inch crushed stone for the base layer. Some contractors use a two-layer system: 1.5-2 inches of larger stone (1-1.5 inches) for drainage, topped with 2-3 inches of smaller stone (3/4 inch) for stability.
Calculate your volume before ordering. Measure your shed footprint length × width × depth (typically 4-6 inches total). Divide by 27 to get cubic yards. Order slightly more than you calculate.
Proper compaction and tamping techniques
Spread gravel evenly across your prepared base in 2-3 inch layers. Use a hand tamper for small areas or rent a vibratory plate compactor for anything larger than 200 square feet. Compact each layer thoroughly before adding the next. A well-compacted gravel base won’t shift under the weight of the shed. After compacting, use your carpenter’s level again to verify you’ve maintained your slope.
Leveling Ground for Shed: Achieving the Perfect Slope
Getting the slope right is critical. Too much slope and your shed looks tilted. Too little and water pools at the base.
Managing uneven terrain and slope challenges
If your site slopes significantly in one direction, you have two options: work with the slope by placing the shed at the high point, or fight it by adding fill and creating a level platform. For steep slopes, consider a skid foundation or concrete blocks set at different heights to compensate. Riehl Structures can design your shed placement to work with your site’s natural slope, turning a challenge into a practical solution.
For gentle slopes, create a level platform by adding fill to the low side and compacting it thoroughly.
Measuring your shed footprint accurately
Mark your exact shed footprint with string and stakes before you begin any site prep. Measure diagonally corner to corner, both diagonals should be equal length. Use a carpenter’s square to verify 90-degree corners. Small errors in layout become obvious once construction begins and are difficult to fix later. Take photos from multiple angles as your reference during the entire preparation process.
Shed Foundation Options: Concrete Blocks vs. Gravel
Different foundation types suit different situations.
Comparing skid foundations, concrete blocks, and gravel bases
Gravel base is the simplest and most affordable option. A 4-6 inch layer of compacted crushed stone creates a stable, draining foundation. It works well on level or gently sloping sites with good drainage. Cost is minimal, typically under $200 for a 10×12 shed footprint. Gravel can shift over time, especially on slopes, and requires occasional raking to maintain level.
Concrete blocks provide more stability and longevity. Place blocks on compacted gravel at each corner and at regular intervals along the perimeter. Blocks elevate the shed, improving drainage and air circulation underneath. They’re adjustable, you can shim blocks up or down to achieve perfect level. Cost runs $300-600 depending on block quantity. Concrete blocks work particularly well on slopes.
Skid foundation (pressure-treated wood runners or steel beams) distributes weight across a wider base than blocks and works on sloped terrain where concrete blocks would be impractical. Cost is higher, typically $600-1000, but the flexibility is valuable for challenging sites. Skids require adequate drainage underneath to prevent rot.
The best choice depends on your site conditions. Level, well-draining ground? Gravel base is sufficient. Sloped terrain? Concrete blocks or skids. Wet or clay-heavy soil? Concrete blocks or skids elevated for airflow.
Long-term maintenance and structural integrity
Gravel bases need occasional releveling as stone settles. Check your shed’s level annually and add gravel as needed. Concrete blocks require minimal maintenance, check them annually for settling or movement. Skid foundations need inspection for rot if wood is used; pressure-treated wood lasts 20+ years. The cheapest foundation upfront isn’t always the best value long-term.
Common Mistakes to Avoid During Ground Preparation
Skipping the level check. A shed that’s off by half an inch across its length will be noticeably tilted and will develop door alignment problems within months. Use your carpenter’s level repeatedly.
Ignoring drainage. A shed built in a low spot that collects water will rot from the bottom up. Spend time understanding your site’s water flow before you break ground.
Inadequate compaction. Loose soil settles under the shed’s weight, creating depressions and uneven support. Compact in layers using a mechanical compactor.
Mixing soil types. If you’re adding fill, use the same soil type as what’s already there. Mixing clay and sand creates layers that settle at different rates.
Forgetting about vegetation. Grass and roots under your shed will rot and create voids. Remove every trace of vegetation, including roots.
Building without permits. This creates legal and insurance problems later. Get permits, they’re usually inexpensive and protect you.
Not checking for utilities. Call 811 before you dig. Wait for markings. This takes a few days but prevents catastrophe.
Proper site preparation is the foundation of a shed that lasts. It’s the most important phase of the entire project. A shed built on a solid, level, well-drained base will serve you for decades with minimal maintenance.
When you’re ready to move forward with your shed project, Riehl Structures brings decades of experience in custom-designed outdoor structures built with Amish craftsmanship. We help you understand your site conditions, guide you through local permitting requirements, and offer flexible financing with no prepayment penalties. Our team can walk you through site preparation specifics for your exact location and shed design. Get a quote now and let us help you build something that lasts.
| Preparation Phase | Key Action | Tools Needed | Time Estimate |
|---|---|---|---|
| Site Assessment | Check soil type, drainage, slope, utilities | Soil sample, level, 811 call | 1-2 hours |
| Clearing | Remove sod, vegetation, debris | Flat shovel, sod cutter (optional) | 2-6 hours |
| Leveling | Grade soil to level or slight slope | Carpenter’s level, hand tools | 3-8 hours |
| Compaction | Compact soil in layers | Hand tamper or plate compactor | 2-4 hours |
| Fabric Installation | Lay geotextile moisture barrier | Landscape fabric, stakes | 1-2 hours |
| Gravel Base | Spread and compact crushed stone | Wheelbarrow, compactor | 2-4 hours |
| Final Check | Verify level and drainage | Carpenter’s level | 0.5-1 hour |
According to research on outdoor structure durability, proper site preparation reduces settling and foundation problems by over 80 percent compared to rushed installations. Riehl Structures has helped countless customers in the Greater Philadelphia and Chester County regions navigate site preparation for their custom sheds and outdoor structures. We understand local soil conditions, drainage challenges, and permitting requirements in Pennsylvania. Our team is available to answer your site-specific questions and ensure your foundation is built to last.
Frequently Asked Questions
Do I need to prepare ground for shed if my yard is uneven?
Yes, proper site preparation is essential regardless of terrain. Even sloped yards can accommodate a shed with correct grading and drainage planning. Uneven ground without leveling can lead to structural issues, water pooling, and premature deterioration. A qualified site assessment helps determine whether you need minor grading adjustments or more extensive excavation. Many homeowners with sloped properties successfully install sheds by managing slope strategically to direct water runoff away from the structure.
What's the best gravel shed base material to use?
Crushed stone or compacted gravel serves as an excellent sub-base material for shed foundations. Use 4-6 inches of quality aggregate, properly tamped to create a stable, well-draining foundation. The base material prevents ground moisture from compromising structural integrity and reduces weed growth around the perimeter. Landscape fabric or geotextile underneath the gravel further enhances drainage and prevents soil erosion. Proper compaction of the base material is critical, use a tamping tool to ensure even settling and long-term stability.
How do I prevent water from pooling around my shed foundation?
Effective drainage requires three key elements: proper grading that slopes away from the shed, a moisture barrier like landscape fabric beneath your base material, and careful management of water runoff. Grade the site so water naturally flows away from the structure's perimeter. Install geotextile fabric before adding crushed stone to prevent soil erosion and improve drainage. Consider creating a slight crown or slope in the ground around the shed footprint. Adequate drainage prevents ground moisture accumulation, which protects the shed's long-term structural integrity and prevents rot or foundation settling.
What shed foundation options work best for different soil types?
Foundation choice depends on soil composition and local conditions. Sandy or well-draining soil works well with a gravel base and landscape fabric. Clay-heavy soil may require deeper excavation and enhanced drainage solutions, possibly including concrete blocks for better ground contact separation. Sloped terrain benefits from concrete block foundations that can be leveled independently. Before selecting a foundation option, assess your soil type and drainage patterns. Consider local building codes and permit requirements, many Pennsylvania townships have specific foundation standards. When in doubt, consult a professional to ensure your chosen foundation method provides adequate structural integrity for your shed's size and intended use.
This article was written using GrandRanker

Copy Link