Shed Foundation Alternatives to Concrete: 7 Options Compared
Copy Link
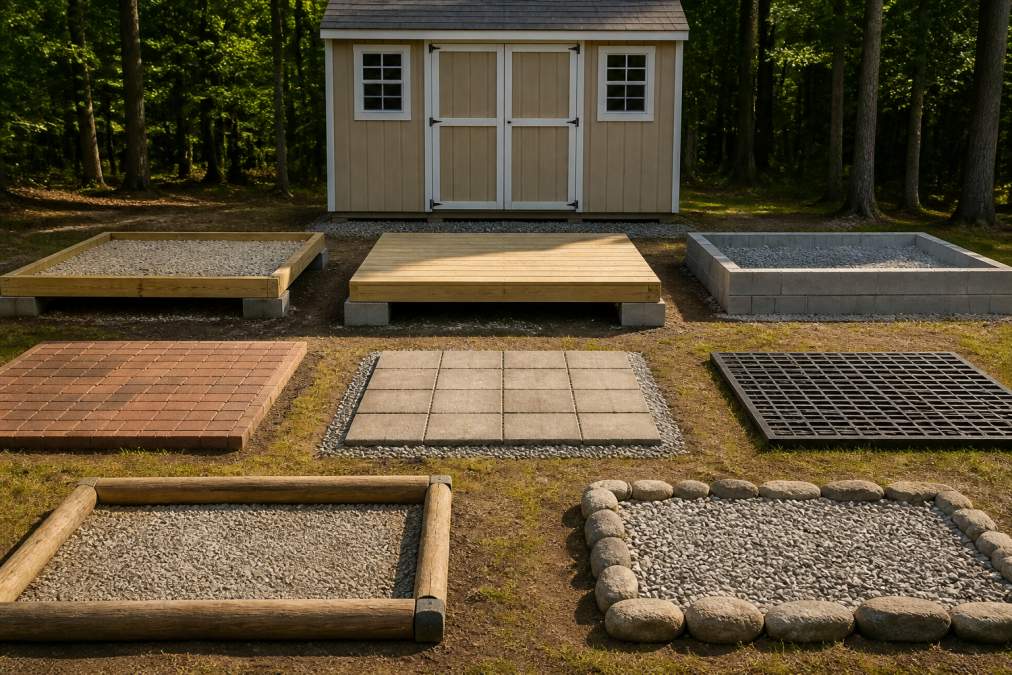
Table of Contents
- Shed Foundation Alternatives to Concrete: Your Options
- Gravel Pad Foundations: Pros, Cons, and Installation
- Pressure-Treated Timber Skids: Elevation and Longevity
- Plastic Grid Foundation Systems: Drainage Without Digging
- Concrete Pier and Beam Foundations: Adjustable Support
- How to Build a Shed Foundation on Uneven Ground
- Shed Foundation Cost Comparison: What You’ll Actually Spend
- Foundation Failure: What Goes Wrong and How to Prevent It
Shed Foundation Alternatives to Concrete: 7 Options Compared
Last Updated: August 4, 2026
When homeowners face the question of how to support a new shed, concrete seems like the default answer. But it’s not the only one, and for many properties, it’s not even the best choice. Riehl Structures has worked with hundreds of property owners across Pennsylvania who discovered that shed foundation alternatives to concrete often deliver better results at lower cost, especially on uneven terrain or in areas prone to moisture. Below, we’ll walk you through seven proven alternatives, each with real pros, cons, and installation guidance that will help you pick the right foundation for your specific situation.
Concrete foundations crack under ground shift, are expensive to pour and cure, and can trap moisture underneath your structure if drainage isn’t perfect. The best shed foundation alternatives to concrete address these exact problems, some by elevating your shed, others by allowing water to flow through rather than pool underneath.
Why Homeowners Skip Concrete
Most people assume concrete is mandatory because it’s what they see on commercial buildings. In reality, residential sheds operate under completely different load requirements. A typical 8×10 shed weighs 2,000-3,000 pounds when loaded with tools and storage, a fraction of what concrete is engineered to handle.
Concrete also introduces hidden costs: ground preparation, excavation, leveling, compacting, and forming run $500-$1,500 depending on your lot size and slope. Then you wait 7-14 days for the concrete to cure before you can build on top of it. The real advantage of exploring shed foundation alternatives to concrete is that many options skip these headaches entirely. You get a stable base faster, avoid curing delays, and several alternatives actually improve with minor ground settling because they’re designed to adjust.
Gravel Pad Foundations: Pros, Cons, and Installation
A gravel pad foundation is one of the simplest and most cost-effective approaches. You dig a shallow basin 4-6 inches deep, line it with landscape fabric to prevent weeds and soil migration, then fill it with compacted crushed stone or pea gravel. The result is a permeable, level surface that drains water away from your shed’s underside.
This method works especially well in areas with moderate rainfall and relatively flat terrain. The compacted gravel creates enough bearing capacity for small to medium sheds, and the permeability means standing water won’t pool underneath during heavy storms. Many property owners in Chester County choose gravel foundations because they integrate seamlessly with existing landscaping and can be installed in a single day.
How to Build a Gravel Foundation
Total Time: 4-6 hours for a standard 8×10 shed
Difficulty Level: Beginner
What You’ll Need:
- Landscape fabric or geotextile membrane
- Crushed stone or 3/4-inch gravel (4-6 cubic yards for 8×10 shed)
- Plate compactor or hand tamper
- Level
- Measuring tape
- Shovel
Step 1: Mark and Excavate [Time: 1-2 hours]
Outline your shed footprint using stakes and string, then mark an area 2 feet larger on all sides. Excavate 4-6 inches deep across the entire area. Remove any large rocks, roots, or debris.
Step 2: Install Landscape Fabric [Time: 20 minutes]
Lay landscape fabric or geotextile membrane across the excavated area. This barrier prevents soil from migrating up into your gravel and stops weeds from growing through. Overlap seams by 12 inches and secure edges with landscape staples or rocks.
Step 3: Add and Compact Gravel [Time: 2-3 hours]
Spread crushed stone evenly across the fabric in 2-inch lifts. After each lift, run a plate compactor over the surface. Compact until the gravel no longer shifts underfoot and feels firm. This compaction is critical, it’s what creates bearing capacity.
Step 4: Final Level Check [Time: 30 minutes]
Once all gravel is compacted, use a long level (4-6 feet) to check for high and low spots. Remove gravel from high areas and add it to low areas. Recompact after adjustments. Your final surface should be level to within 1/4 inch across the entire footprint.
Use a plate compactor, not a hand tamper, if your shed is larger than 6×8. The mechanical compaction creates denser, more stable bearing surfaces.
Pressure-Treated Timber Skids: Elevation and Longevity
Pressure-treated timber skids are 4×4, 6×6, or 8×8 beams that run the width of your shed, sitting either directly on the ground or on concrete blocks for added elevation. This approach elevates your shed, improves airflow underneath, and reduces moisture contact with the floor frame. By raising your shed 6-12 inches off the ground, you create airflow that keeps the underside dry and dramatically extends the life of your floor joists, preventing the rot and mold problems that plague ground-level structures.
Installation Steps for Skid Foundations
Total Time: 3-4 hours
Difficulty Level: Beginner to Intermediate
What You’ll Need:
- Pressure-treated 4×4 or 6×6 lumber (cut to shed width)
- Concrete deck blocks or piers (typically 2-4 blocks per skid)
- Landscape fabric and gravel for base (optional but recommended)
- Level
- Measuring tape
- Circular saw (if cutting lumber to length)
Step 1: Prepare the Base [Time: 1-2 hours]
Mark out your skid locations, typically one skid every 4-6 feet along the shed length. Lay landscape fabric in these areas and add 2-3 inches of compacted gravel.
Step 2: Set Concrete Blocks [Time: 30-45 minutes]
Position concrete deck blocks at each skid location, spacing them so they support the timber evenly. Use a level to ensure blocks are roughly level to each other.
Step 3: Position and Level Skids [Time: 1-1.5 hours]
Lay your pressure-treated timber across the blocks. Use a long level to check for high spots. If one end is higher, add shims (thin wood wedges) under the blocks at the low end. The goal is level to within 1/4 inch along the length of each skid.
Step 4: Verify Spacing and Secure [Time: 30 minutes]
Measure the distance between skids to ensure it matches your floor joist span. For most 8-10 foot wide sheds, skids are spaced 4-6 feet apart. Once positioned, you can secure skids to blocks with lag bolts (optional for small sheds, recommended for larger structures).
Pressure-treated lumber contact with soil can still degrade over 15-20 years, even with chemical treatment. If your shed will sit for decades, consider placing skids on concrete blocks elevated at least 2-3 inches above soil. This eliminates ground contact entirely and extends the foundation life indefinitely.
Plastic Grid Foundation Systems: Drainage Without Digging
Plastic grid systems like TuffBlock and ProBASE represent a newer category of shed foundation alternatives to concrete. These modular plastic blocks or grids interlock to create a stable base that sits directly on compacted soil while allowing water to drain through. There’s no digging, no gravel to compact, no waiting for anything to cure. You unpack the blocks, arrange them in a grid pattern, and place your shed on top. The plastic is UV-stabilized and won’t rot.
The downside is cost. A plastic grid system for an 8×10 shed typically runs higher than a gravel pad, though it’s comparable to or less expensive than a concrete pour. You’re paying for convenience and longevity, plastic won’t settle or degrade the way gravel can shift over time.
Concrete Pier and Beam Foundations: Adjustable Support
Concrete piers (also called deck blocks or post bases) are pre-cast concrete footings that sit on the ground and support posts or beams. This approach gives you the stability and longevity of concrete in a modular, adjustable format. Instead of pouring a full slab, you place individual piers at key support points.
Piers work well on uneven ground because each one can be shimmed independently to achieve level. If your shed site slopes moderately, piers let you accommodate that slope without extensive site grading. You space piers every 4-6 feet along the shed length, place posts or beams on top, and attach your floor frame to those beams. The trade-off is that piers alone don’t address moisture as well as elevated skid systems do. Piers work best when combined with good site drainage and at least 6-12 inches of clearance between the ground and your floor frame.
How to Build a Shed Foundation on Uneven Ground
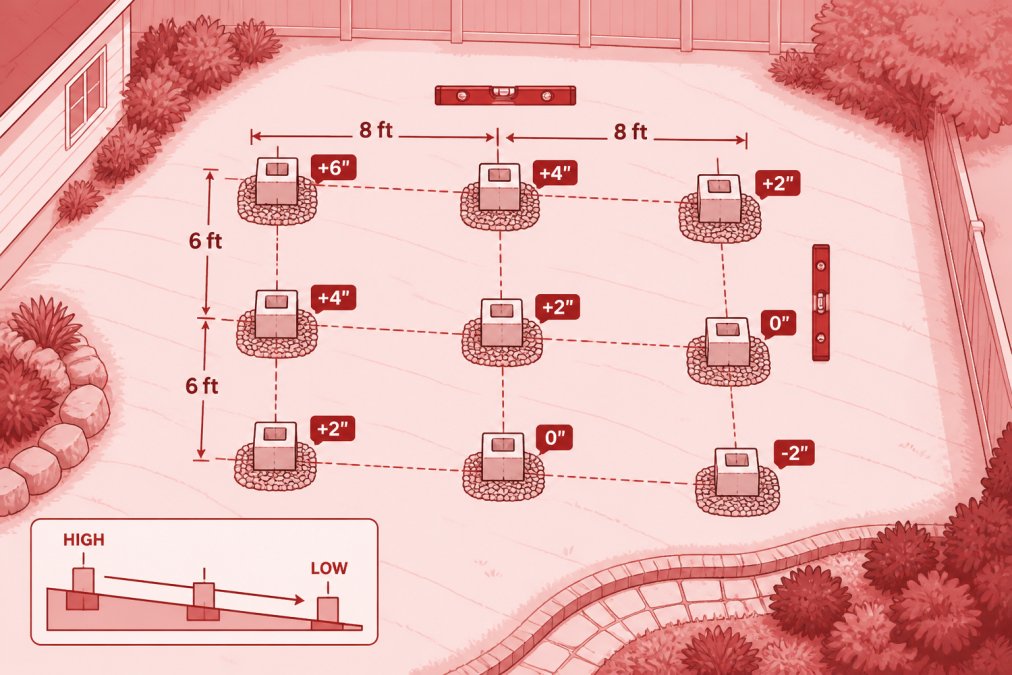
Uneven terrain is where shed foundation alternatives to concrete really shine. Concrete requires extensive site grading to create a level surface, which means moving significant amounts of soil. Alternative foundations adapt to slope rather than fighting it.
Assessing Your Slope and Site Grading
Before choosing a foundation type, measure your site’s slope. Use a long level and measuring tape to determine how much elevation change occurs across your shed footprint. A slope of 1-2% (roughly 1 inch of drop per 8 feet) is manageable with most foundation systems. Slopes steeper than 5% require either significant grading or a foundation system designed for slope.
Check for drainage patterns. Where does water flow during heavy rain? If water naturally drains away from your shed location, you have flexibility. If water pools or flows toward the site, you’ll need a foundation system with excellent drainage, gravel pads and plastic grids excel here. Also identify soil type by digging a small hole: is the soil clay (compacts hard, holds water), sand (drains quickly, doesn’t compact well), or loam (balanced, easiest to work with)? Clay soils are more prone to settling and require better drainage.
Leveling Techniques for Each Foundation Type
Gravel pads on slope: If your slope is gradual (under 3%), you can build a gravel pad across the slope by adjusting the depth of excavation. Dig deeper on the high end and shallower on the low end so the final gravel surface is level.
Skids on slope: Skids adapt beautifully to slope because you adjust the height of the blocks under each skid independently. On a 3-4% slope, your low-end blocks might sit directly on soil while your high-end blocks are elevated 6-8 inches.
Plastic grids on slope: Most plastic grid systems have adjustable feet or can be shimmed to accommodate minor slope. For slopes steeper than 3%, you may need to remove soil from the high end or add fill at the low end.
Piers on slope: Piers are ideal for slope because you can vary the height of each pier independently. On a significant slope, you might have piers on the high end sitting directly on soil and piers on the low end elevated on blocks or posts.
Shed Foundation Cost Comparison: What You’ll Actually Spend
Cost varies significantly based on shed size, site conditions, and labor. A 8×10 shed foundation can range from $200-$1,500 depending on the method and whether you do the work yourself or hire help.
| Foundation Type | Material Cost | Labor Cost (DIY-Friendly) | Best For |
|---|---|---|---|
| Gravel Pad | $150-$400 | 4-6 hours | Level to gentle slope, good drainage |
| Pressure-Treated Skids | $100-$500 | 3-4 hours | Elevation priority, moisture concerns |
| Plastic Grid System | $400-$800 | 1-2 hours | Quick installation, adjustable terrain |
| Concrete Piers | $150-$300 | 2-3 hours | Moderate slope, flexibility needed |
| Concrete Slab | $400-$1,500 | Professional only | Large structures, commercial use |
Material costs scale with shed size. A 12×16 shed requires roughly twice the material of an 8×10. For DIY installation, gravel pads and skids are most forgiving. Plastic grid systems require the least labor but cost more upfront. If hiring labor, expect to pay $50-$150 per hour depending on your region.
The real cost advantage of shed foundation alternatives to concrete becomes clear when you factor in site preparation. Concrete requires extensive grading on uneven sites, which can double the total cost. Alternative foundations accommodate slope naturally.
For most homeowners, a gravel pad or skid foundation costs 40-60% less than concrete and can be installed in a single day. The time and cost savings make these alternatives worth serious consideration even before you evaluate performance.
Foundation Failure: What Goes Wrong and How to Prevent It
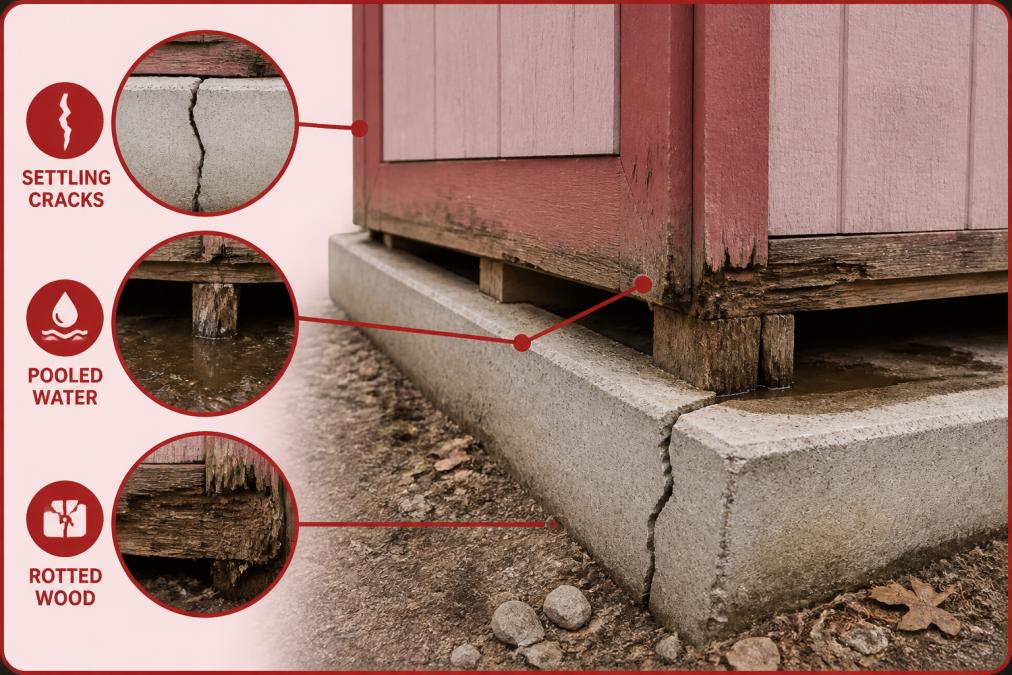
Not all shed foundations fail, but many do, and the failure mode tells you what went wrong during installation.
Common Installation Mistakes
Insufficient compaction is the #1 cause of gravel pad failure. If gravel isn’t compacted properly, it settles unevenly under the shed’s weight. Your shed tilts within the first year, doors stop closing, and stress cracks appear. Prevention: use a plate compactor and make multiple passes over each gravel lift until the surface feels rock-solid.
Skipping landscape fabric leads to gravel migration and soil contamination. Over time, soil works up into the gravel, reducing its bearing capacity. Prevention: always use geotextile fabric between soil and gravel, and extend it at least 2 feet beyond the shed footprint.
Poor drainage causes moisture to accumulate under the shed. Wood rots, metal rusts, and the structure deteriorates faster. This happens when the foundation is perfectly level but water can’t escape because the ground slopes toward the shed. Prevention: ensure the ground around your shed slopes away from the structure at least 1% (1 inch drop per 100 feet).
Uneven pier placement creates stress on floor joists. If piers are spaced inconsistently or at different heights, the floor frame twists. Prevention: measure pier spacing carefully and use a long level to ensure all piers are at the same height.
Inadequate elevation on wet sites allows ground moisture to wick up into the shed floor. Prevention: elevate your shed at least 6-12 inches above grade, and ensure soil slopes away from the foundation.
Moisture, Settling, and Long-Term Durability
Moisture is the enemy of all shed foundations. It causes wood to rot, metal to rust, and concrete to crack as water freezes and thaws. The best shed foundation alternatives to concrete address moisture through drainage and elevation.
Gravel pads drain water through the gravel layer, preventing pooling. Skids elevate the shed, creating airflow that dries the underside. Plastic grids have perforated designs that shed water immediately. Settling is inevitable on most sites, but the question is whether your foundation accommodates settling or fights it. Gravel pads settle slightly but evenly if properly compacted. Skids on blocks can be shimmed if settling becomes noticeable. Plastic grids adjust for settling with their modular design. Concrete slabs crack if settling is uneven because concrete is rigid.
Longevity depends on material durability and maintenance. Pressure-treated lumber lasts 15-25 years in ground contact, longer if elevated. Concrete lasts 30+ years if not damaged by frost heave or poor drainage. Plastic grids last indefinitely. The real durability advantage of shed foundation alternatives to concrete is that many are repairable. A failing gravel pad can be refreshed with new gravel. Failing skids can be replaced without disturbing the shed.
Riehl Structures and Your Foundation Decision
Choosing the right foundation matters because it determines how long your shed lasts and how much maintenance you’ll need. At Riehl Structures, we’ve worked with hundreds of property owners in Chester County and the Greater Philadelphia region who faced exactly this decision. Our custom-built Amish sheds are designed to sit on any of these foundation types, and we’ve learned which approaches work best for different sites and budgets.
When you order a shed from Riehl Structures, we help you assess your site and recommend the foundation that matches your terrain, drainage, and timeline. Our free delivery within 30 miles of our West Chester and King of Prussia locations includes site consultation, so you’re not guessing about what will work on your property. We’ve also worked with property owners dealing with uneven ground, wet sites, and tight budgets, situations where shed foundation alternatives to concrete deliver better results than pouring concrete.
The quality of your foundation directly affects the quality of your shed investment. A premium Amish-built structure deserves a foundation that will support it for decades. Our team can walk you through each option, explain the trade-offs, and help you avoid the common mistakes that lead to settling, rot, and premature failure.
The foundation you choose shapes your shed’s lifespan, your installation timeline, and your long-term maintenance burden. Concrete feels like the safe default, but it’s rarely the best choice for residential sheds on typical residential sites. Shed foundation alternatives to concrete, gravel pads, skids, plastic grids, and piers, address the real problems homeowners face: uneven terrain, moisture, settling, and cost. If you’re ready to move forward with a shed installation and want expert guidance on the right foundation for your property, reach out to Riehl Structures. We’ll assess your site, explain your options clearly, and help you build on a foundation that lasts.
Frequently Asked Questions
What are the best shed foundation alternatives to concrete for Pennsylvania homeowners?
Gravel pads, pressure-treated timber skids, plastic grid systems, and concrete piers each work well depending on your site. Gravel excels in well-draining areas; timber skids suit sloped terrain; plastic grids work on uneven ground without digging; piers offer adjustability. Pennsylvania's frost line (36-48 inches deep) matters, piers and skids elevate structures above frost heave risk better than gravel alone. Choose based on your drainage, slope, and whether you need future relocation.
How much does a gravel shed foundation cost compared to other alternatives?
Gravel pads typically cost $1-3 per square foot for materials, making them the cheapest option upfront. Timber skids run slightly higher due to pressure-treated lumber costs. Plastic grid systems and concrete piers fall in the mid-range. Labor varies significantly, DIY gravel saves money but requires proper compaction and leveling. For accurate pricing on custom shed installations with site prep included, contact Riehl Structures for a quote tailored to your property.
Can I install a shed foundation on uneven ground without expensive grading?
Yes. Plastic grid systems and concrete piers adjust for slopes up to 6-12 inches without major grading. Timber skids also adapt to gentle slopes when properly shimmed. Gravel pads require more leveling work but can still work on moderate slopes with careful site preparation and compaction. Steeper slopes need retaining walls or significant grading. Riehl Structures can assess your yard's slope and recommend the best foundation type, free delivery includes site evaluation within our service area.
What causes shed foundations to fail, and how do I prevent it?
Poor compaction, inadequate drainage, and frost heave are the leading causes. Gravel settles unevenly without tamping; moisture under timber causes rot; piers shift on unprepared soil. Prevention: compact all base material thoroughly, ensure water drains away (not toward the shed), use geotextile fabric to separate soil from gravel, and elevate the structure above ground contact when possible. In Pennsylvania, bury piers or skids below the frost line or use adjustable systems that accommodate seasonal movement.
Which shed foundation works best on my sloped or uneven yard?
Plastic grid systems and adjustable concrete piers handle slopes of 6-12 inches with minimal site prep. Timber skids work on moderate slopes when shimmed correctly. Gravel pads require more leveling labor on slopes. For steeper grades, you may need retaining walls or significant grading. The best choice depends on your slope angle, soil type, and budget. Riehl Structures offers free site assessment to determine the right foundation for your property's terrain.
This article was written using GrandRanker

Copy Link