How to Build a Pergola: Step-by-Step DIY Guide
Copy Link
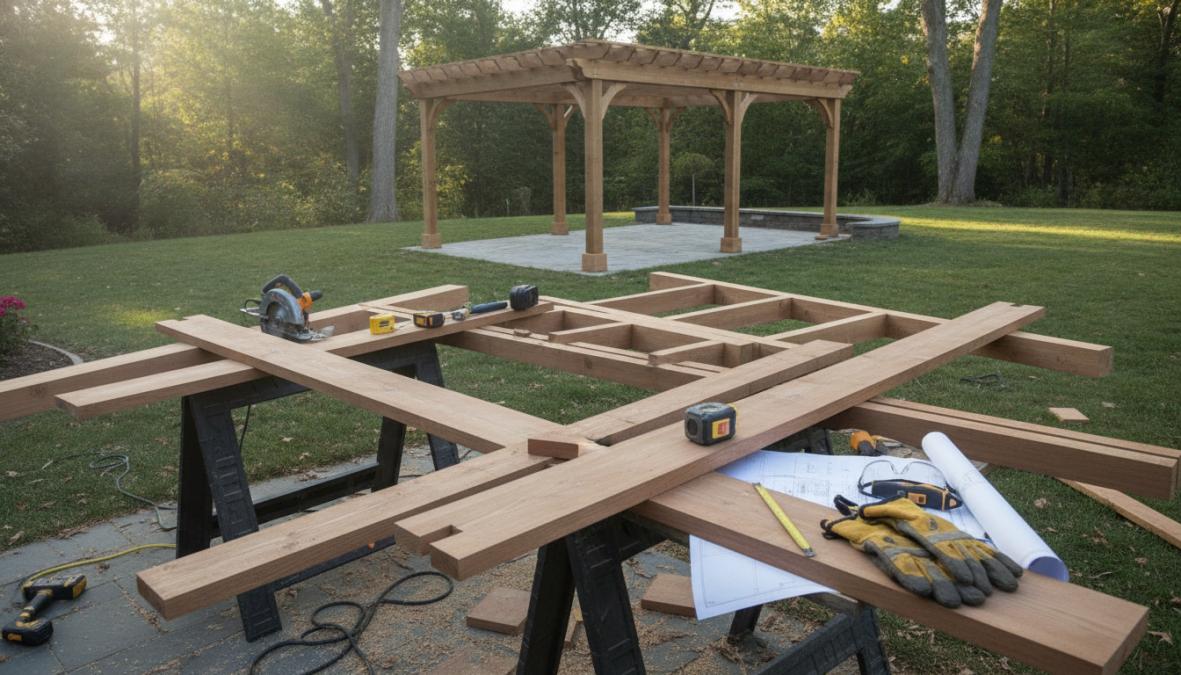
Table of Contents
- Planning and Design: How to Build a Pergola That Fits Your Space
- Pergola Building Permits and Zoning Laws
- Tools, Materials, and Hardware You’ll Need
- Best Wood for Pergola and Foundation Options
- How to Anchor a Pergola: Setting Posts and Beams
- Building Rafters and Adding Shade Slats
- Pergola Cost Breakdown and Material Considerations
- Finishing, Maintenance, and Longevity
Last Updated: July 7, 2026
Planning and Design: How to Build a Pergola That Fits Your Space
Before buying materials, understand your space and needs. The best pergolas start with a clear plan: decide whether you’re building free-standing or attached to your house, determine the right size, and establish how much shade you want. These decisions cascade through every step, from foundation depth to lumber dimensions.
Choosing Between Free-Standing and Attached Pergolas
A free-standing pergola sits independently with four posts anchored in concrete footings. An attached pergola connects to your house via a ledger board, using your home’s structure as one side of support.
Free-standing pergolas offer flexibility, place them anywhere in your yard. They avoid house-related permits but require solid concrete footings at all four corners. Attached pergolas save materials and labor by using your house for support, but require precise ledger board installation directly to your home’s structure. Improper installation is a common cause of structural failure, and you must account for roof lines, gutters, and water drainage.
If uncertain about local building codes, a free-standing pergola is often safer. It’s easier to relocate and won’t compromise your home’s weatherproofing.
Creating Your Pergola Plans and Layout
Measure your space carefully. Most residential pergolas range from 8×8 to 12×16 feet. Sketch the footprint to visualize placement. Decide your pergola’s purpose, shade for seating, climbing vines, framing a view, as this affects purlin spacing and rafter angle.
Standard post spacing is 8 to 10 feet apart, balancing structural integrity with material efficiency. Create a site layout showing post locations, beam direction, and rafter orientation. Call 811 before digging to mark underground utilities; hitting a buried power line turns a project into an expensive disaster.
Pergola Building Permits and Zoning Laws
Building permits ensure structures are safe and compliant with local codes. Ignoring permits creates liability and can complicate insurance claims or home sales.
Understanding Local Requirements
Permit requirements vary by location. Some municipalities require permits for structures over 200 square feet; others only for structures attached to homes. Call your local building department and ask: Do I need a permit? What size triggers a requirement? What setback distances apply? Are there height restrictions?
Zoning laws impose setback requirements, minimum distances from property lines and neighboring homes. Building too close to a property line means forced removal or relocation, wasting your work and materials.
Building without a required permit can result in fines, forced removal, or complications when selling your home. Permit costs are almost always less than fixing code violations.
Navigating the Permit Process
Most applications require a site plan showing your lot, pergola location, dimensions, and distance from property lines. Some jurisdictions request construction details like post size, beam dimensions, and foundation depth. The process typically takes 1-4 weeks. Once approved, you’ll receive a permit number and inspection schedule, usually a foundation inspection before pouring concrete and a final inspection after construction.
Tools, Materials, and Hardware You’ll Need
Essential Tools and Safety Gear
A circular saw is your primary cutting tool. A speed square marks accurate crosscuts and ensures plumb posts. An impact driver speeds up fastening. You’ll also need a 4-foot level, tape measure, post hole digger, and shovel.
Safety gear is non-negotiable: safety glasses, work gloves, steel-toed boots, and hearing protection. Additional helpful tools include a miter saw for precise cuts, a carpenter’s square for layout, and a power auger for digging multiple holes.
Lumber Dimensions and Galvanized Hardware
Standard pergola sizes are 4×4 for posts, 2×8 or 2×10 for beams, and 2×6 for rafters. All hardware must be galvanized or stainless steel to resist rust. This includes structural screws, joist ties, post bases, and bolts. Simpson Strong-Tie is the industry standard for post anchors and joist ties.
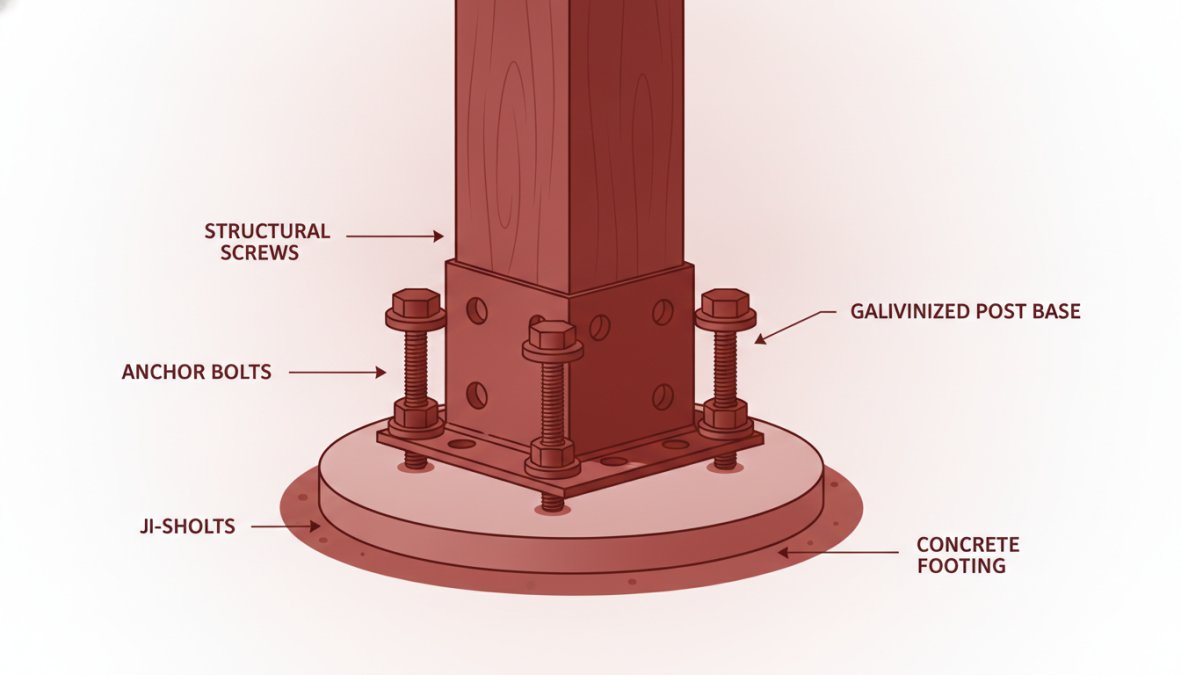
Post bases secure posts to concrete footings and prevent water pooling at the wood base, which causes rot. Joist ties connect beams to posts and rafters to beams. Structural screws are preferable to nails, they hold better and won’t back out over time.
Budget for quality galvanized hardware. It represents a small percentage of total cost but dramatically extends your pergola’s lifespan.
Best Wood for Pergola and Foundation Options
Pressure-Treated Lumber vs. Cedar and Composite
Pressure-treated lumber is the most affordable option and resists rot and insects. It’s rated for ground contact and lasts 20+ years with basic maintenance. The downside: it’s heavy and requires staining or sealing for appearance.
Cedar is beautiful and naturally rot-resistant, weathering to attractive gray if left unsealed. It costs more and isn’t rated for ground contact, you must use post bases. Cedar requires regular maintenance (staining every 2-3 years) to preserve color.
Composite materials offer low maintenance and excellent durability but cost significantly more. For most DIY builders, pressure-treated lumber is the practical choice, affordable, readily available, and proven durable.
Foundation Variations: Concrete, Deck, and Soil
Concrete footings are the most reliable approach. Dig below your local frost line (typically 3-4 feet in cold climates, 1-2 feet in mild climates), pour concrete, and set a post base in the wet concrete. This method works in any climate and provides excellent stability.
If building on an existing deck, attach pergola posts directly to the deck frame using bolts or structural screws. This requires the deck to be structurally sound and able to handle the additional load.
Building directly in soil without concrete is not recommended, soil shifts with freeze-thaw cycles, causing posts to move and the structure to become unstable. For most residential pergolas, concrete footings with post bases are the best choice.
How to Anchor a Pergola: Setting Posts and Beams
Installing Post Bases and Concrete Footings
Mark post locations using string lines or chalk. For a rectangular pergola, measure diagonals to ensure square corners, diagonals should be equal length.
Dig post holes below your local frost line, wide enough for concrete around the base. For a 4×4 post, an 8-10 inch diameter hole is typical. Pour 4-6 inches of gravel for drainage, then add concrete. Set your post base in wet concrete, checking that it’s level and square. Allow concrete to cure for 48 hours before installing posts.
Ensuring Posts Are Plumb and Level
Cut 4×4 posts to length (typically 8-10 feet for residential pergolas). Place each post in its base and secure with bolts or structural screws per manufacturer instructions. Use a level to check that each post is plumb in two directions. A post even slightly out of plumb will cause beams to be uneven and create structural stress. Brace posts temporarily with diagonal supports while installing beams.
Securing Beams and Installing Joist Ties
Cut beams to length and lift them onto posts. Check that beams are level; if not, shim under the post base with galvanized shims. Fasten beams to posts using joist ties, metal brackets that prevent beams from sliding and provide lateral support. Simpson Strong-Tie joist hangers are standard, installed per manufacturer specifications.
Building Rafters and Adding Shade Slats
Cutting and Installing Rafters
Rafters are typically 2×6 lumber spaced 2-4 feet apart, depending on desired shade. Closer spacing provides more shade; wider spacing provides more light. Cut rafters to length (typically pergola width plus 6-12 inch overhang on each end). Install rafters perpendicular to beams, spacing evenly and fastening with joist ties or structural screws. Check that each rafter is level.
Attaching Purlins for Shade and Style
Purlins run perpendicular to rafters and rest on top, typically 2×4 or 2×6 lumber spaced 12-24 inches apart. Lay out purlin positions on rafters and install from one end to the other, fastening with structural screws or joist ties. Stagger purlin joints so they don’t all sit on the same rafter. Check that purlins are level and evenly spaced.
Pergola Cost Breakdown and Material Considerations
Budgeting for Materials and Labor
A basic 10×10 free-standing pergola using pressure-treated lumber costs significantly less than cedar or composite options. Costs vary by region and seasonal lumber prices. DIY construction saves labor costs but requires time and skill. Hiring a contractor ensures professional results but adds substantial cost. Factor in tool costs if you don’t already own essential items.
Cost-Benefit Analysis of DIY vs. Custom Options
Building yourself saves money but requires time, effort, and learning. Most DIY builders complete a simple pergola in 3-5 days spread across weekends. Custom pergolas from companies like Riehl Structures offer professionally designed structures tailored to your space with no guesswork about permits or structural adequacy. Riehl Structures provides flexible financing, including Rent to Own with no prepayment penalties, plus free delivery within 30 miles.
Finishing, Maintenance, and Longevity
Staining, Sealing, and Weather Protection
Pressure-treated lumber weathers to gray if left unsealed. If you prefer color, apply wood stain within the first few months. Seal your pergola with water-resistant sealant every 2-3 years to protect from moisture and UV damage. Composite materials require minimal maintenance, no staining or sealing necessary.
Long-Term Care and Seasonal Maintenance
Inspect annually for loose fasteners, cracked wood, or rusted hardware. Tighten loose bolts and replace rusted hardware with galvanized replacements. Clear accumulated snow in heavy-snow areas to prevent damage. Remove debris from purlins regularly, accumulated leaves trap moisture and accelerate decay.
Most well-built pergolas last 20-30 years with basic maintenance. Pressure-treated lumber and galvanized hardware are designed for longevity. Consistent seasonal attention prevents major problems.
Building a pergola is achievable for most homeowners with basic carpentry skills and the right tools. However, many DIY builders underestimate the complexity of permits, foundation work, and structural design. If you want professional results without the learning curve, Riehl Structures offers custom-designed pergolas built with Amish craftsmanship. With flexible financing, no prepayment penalties, and free delivery within 30 miles, Riehl Structures makes it stress-free to add a beautiful outdoor structure to your backyard. Get a quote now and transform your outdoor living space.
Frequently Asked Questions
Do I need a permit to build a pergola in my backyard?
Permit requirements vary by location and zoning laws. Most municipalities require permits for structures over a certain height or footprint, or those attached to your home. Check with your local building department before starting. Some areas classify pergolas as temporary structures exempt from permits, while others treat them like permanent additions. It's always better to obtain permits upfront to avoid fines or having to remove your pergola later.
What is the best wood for a pergola?
Pressure-treated lumber is affordable and rot-resistant, making it ideal for posts and beams. Cedar and redwood offer natural beauty and durability but cost more. Composite materials require less maintenance but have higher upfront costs. For pergola plans, pressure-treated wood is practical for hidden structural elements, while cedar works well for visible rafters and purlins. Consider your climate, maintenance tolerance, and budget when selecting materials.
How do I anchor a pergola so it stays secure?
Use concrete footings for free-standing pergolas, digging 24-36 inches deep below the frost line. Install post bases or post anchors using Simpson Strong-Tie hardware or equivalent galvanized options. For attached pergolas, secure the ledger board to your home's rim joist with structural screws. Ensure all posts are plumb using a level, and use joist ties to connect beams securely. Proper anchoring prevents shifting, settling, and wind damage.
Is it cheaper to build your own pergola than buy one?
DIY pergolas can be less expensive if you have carpentry skills and the right tools. However, permit costs, material waste, and tool rental can add up. Pre-built or custom pergolas from established builders like Riehl Structures offer quality craftsmanship, warranty protection, and hassle-free delivery, factors that justify their cost for many homeowners. Consider your time, skill level, and the complexity of your pergola plans before deciding.
This article was written using GrandRanker

Copy Link